Tuesday, June 14, 2011

A Strawberry Recticule

This post is for a friend of mine that requested this pattern. It's not historically accurate, it's just freaking cute. There are historical hand bags shaped like fruit though, but this pattern is of my own design and uses modern patterning and sewing techniques.

to make this little bag you will need:
14" x the bolt length of red or pink silk taffeta.
20" x the bolt length of green silk taffeta.
black seed beads
a cord for the draw string
36" of ribbon for handles... I used my green silk to back my trim... just to make it stronger
perhaps a tassel to finish off the bottom of the bag.

this is the finished bag:


The only "tutorial" I'm going to give for this project is to remind you about gussets... the construction isn't difficult but it's important if you want a clean finished project is to START and STOP sewing on the X's... otherwise the bag just won't go together well...

I didn't mark 5 things on the pattern...

1. The center line... it runs down the center of the bag pattern piece from tip to tip
2. the placement of the straps... they go inside the bag at the center line about 1/2 underneath drawstring casing.
3. the placement of the eyelet holes for the drawstring... you will place 1 eyelet hole 1/4" on either side of the center line, in the center of the drawstring casing
4. The fact that the lining and the outside fabric DON'T MATCH UP!! They are offset by half... match the edge of the outside fabric to the center line of the lining... you can see this in the picture above.
5. The placement for the seed beads are marked with X's on the pattern.

and without further ado... Here's the pattern! :D


again just like the last pattern... it's in inches... 1 inch squared.

Thursday, June 9, 2011

Regency Drawn Bonnet... Pattern and Tutorial #3

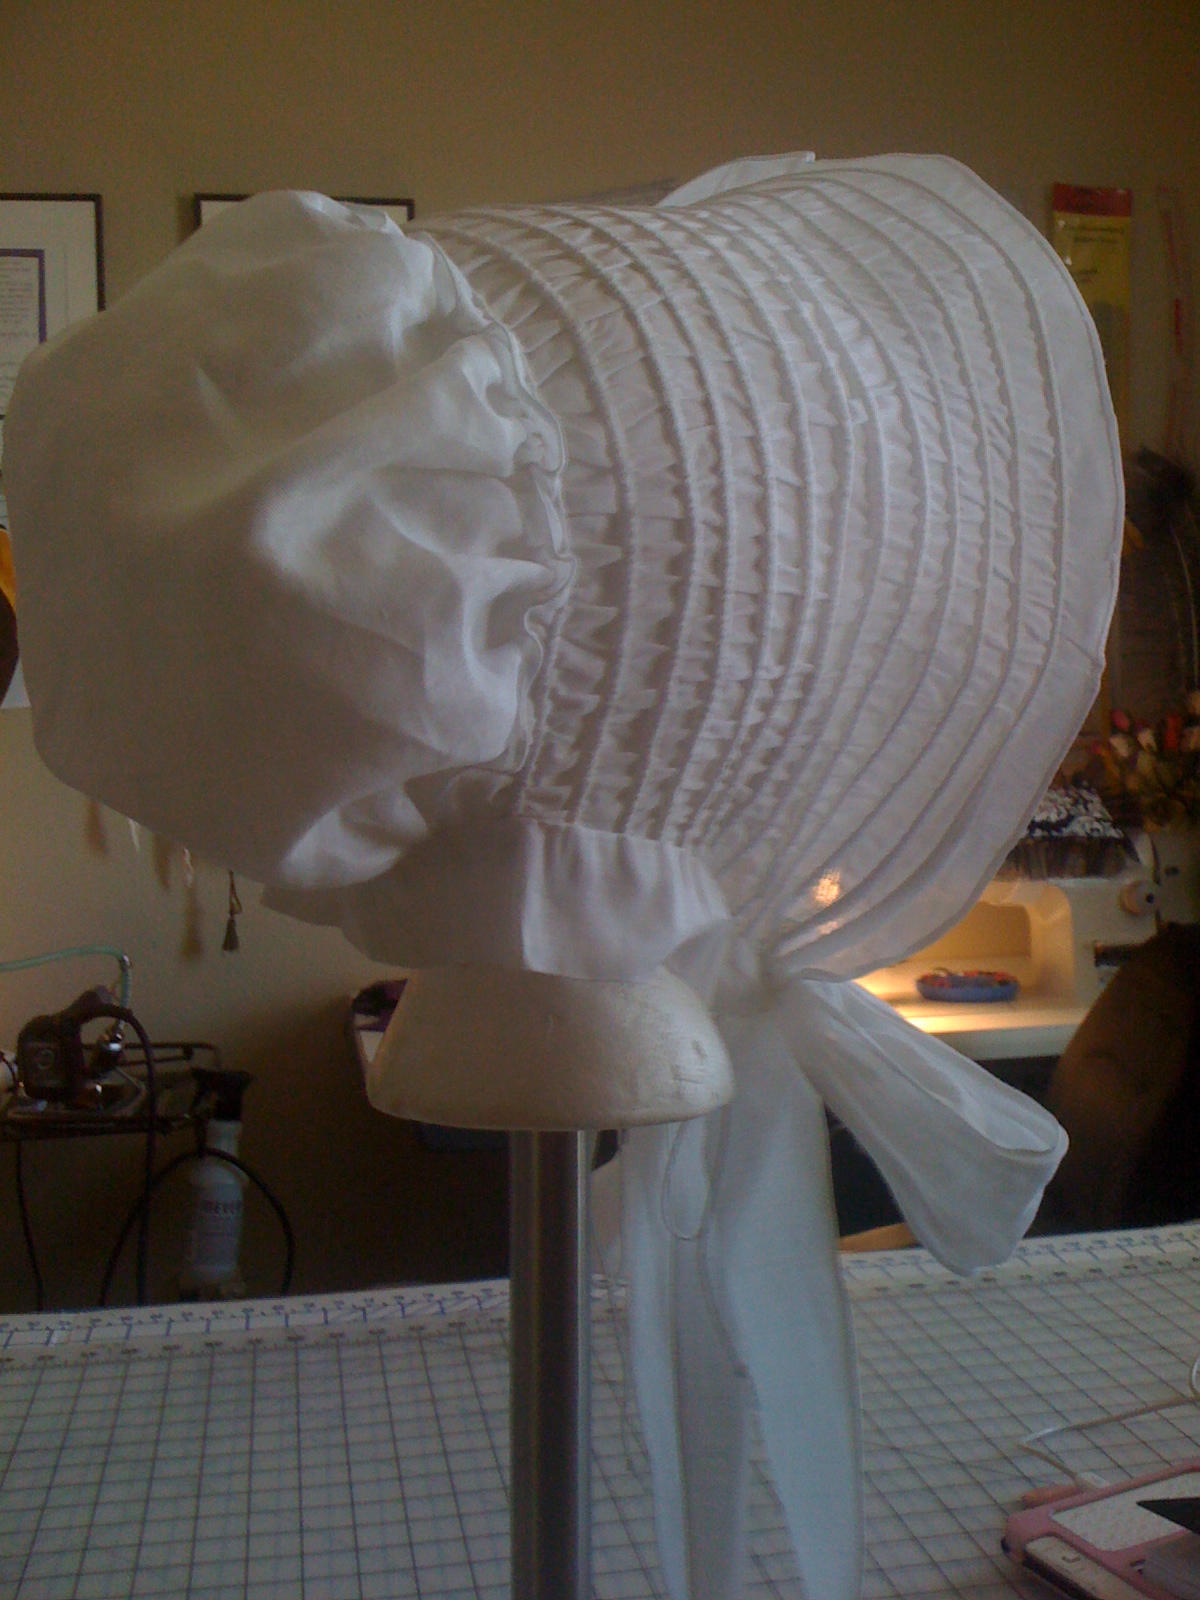
At this point in your project you should have...

all pieces cut
the tip sewn to it's lining and gaged to 14 7/8
Crown/Brim hemmed and all 13 cording channels done

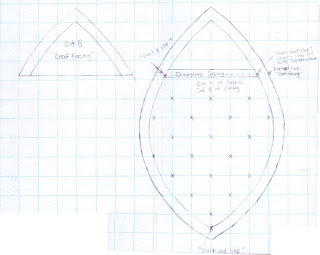
The Crown/Brim pattern is marked with a broken line along it's center. The center front, and center back are marked with an X. It's a good idea to fold and press your linen along this line so that when you draw up your cords the center remains straight and the bonnet doesn't become twisted. You can also use your favorite method of marking your fabric (pen, chalk, thread tack.) As your drawing up your cords you can use a straight edge to maintain the center line.

Now we draw the cording through the channels.

I used an upholstery needle to do the job. I bought a set of old stock 12" double points on eBay. You could use this tool, or a tapestry needle, a ball pointed bodkin, or a Fast Turn or Quick turn tool.

It's a simple matter of threading your tool with your crochet cotton and pulling the yarn through it's channel. Do all the channels. Secure one end of the yarn first with a knot and then with either hand sewing, or back tack multiple times on your machine. Now adjust the cords lengths. I gave you the list of cord lengths last post, but here is the list again:

14 7/8
15 3/4
17 7/8
18
19 3/8
20 5/8
21 1/4
22 1/4
23 7/8
24 5/8
26 7/8
28 1/2
29 5/8

Once again, just to emphasize, make sure that you maintain the center line and that the cords length is evenly divided between the left and right sides of the center line.


Once you have got all your cords measured secure the end with a knot and a back tack on the machine or by hand.

Now we attach the tip to the Crown/Brim.

The tip has been gaged or cartridge pleated to 14 7/8". As you notice this is the same length as the first cord (neck edge). The center of the tip should be marked with an X... or a pin, the C.B of the Crown/Brim is marked with an X. The X on the Crown/Brim C.B is on the cord, NOT on the fabrics edge. This is because the fabrics edge is in fact a ruffle. You will be sewing the gaged tip to the Crown/Brim along the first cord.


Next we will gather the tips neck edge. Mark the center of the tips neck edge (this will be the placement of ties C.B seam) The neck edges total length is 3 1/2"


Next gather the last 3 cords on the Crown/Brim to 1"(these are the longest cords, the face edge cords)... obviously do this on both sides. :D. Sorry, no picture.

Now you'll attach the tie.

Use a 1/2 seam allowance to attach the tie. With right sides together, match the ties C.B seam to the tips C.B. at X.


Now with your 1/8 rolled hem foot roll both sides of the ties edges that WON'T be attached to the bonnet... you should over lap the rolled hem and the 1/2" seam allowance a bit (and inch or so on either side??) so that the ties edge doesn't come unraveled there. This area will take the most strain because this is the place that the tie will be tied and untied every time you put the bonnet on.


Rolled hem foot tip:

Finger press the first fold in your fabric (about an inch in length), place your material under your foot and lower your needle into the pre-rolled section, raise the foot and pull the pre folded edge into your rolled hem foot. Make sure the pressure is set high on the pressure foot dial... this is so that your fabric doesn't slip around inside of the foot and make your rolled hem larger than you wanted. Or worse yet unevenly hemmed, or the fabric coming completely out of the foot and not making a hem at all.


The last thing to do is to finish off the tie. 

The tie does double duty as closure and neck edge facing.  All of the raw edges from the Crown/Brim, tip, and tie are folded up neatly into the tie.  Just fold over the seam allowance and place the folded edge to to the line of stitching that attached the tie to the bonnet. Use a hand whip stitch to attach the tie to the inside of the bonnet.


I added extra ties to my bonnet... I use them for my victorian bonnets and it really helps to keep the bonnet in place. Use a thin cord for the extra tie. The cord tie holds the bonnet in place and lets the real tie look pretty tied loosely. 

The last thing you'll do is starch the bonnet. Use liquid starch and press the bonnet's Brim/Crown flat.  The stiffer the bonnets brim the better!


So, that's that! You made a completely ridiculous bonnet! :D good times!

Sunday, June 5, 2011

Regency Drawn Bonnet... Pattern and Tutorial Part 2

Once you have all pieces cut, the construction is simple enough... if not tedious.

First, you will need the tip. Sorry (my bad) I didn't label my pattern pieces. The tip is the circular piece that is cut on the fold. You'll need that cut of linen and of some kind of sheer, stiff material. I used silk organza, but organdy would work. Using a 1/2" seam allowance sew together the tip and lining together along it's outside edge. Leave the straight edge... this is the neck edge... unsewn.

Trim off the seam allowance and turn the tip right side out, using the neck edge (the straight edge) as your access point.

If your good at whip gathers you don't need to do this, but if your like me and have a hard time keeping your whip gathers consistent and estimating the amount of fabric each stitch needs along the fabrics length, you might want to do like me and cartridge pleat instead. The outside (rounded) edge of the tip needs to be condensed into 14 7/8". If you'd like to learn about whip gathering check out Katherine's Dress Site. She's got a tutorial in there somewhere. :) Alternatively here is a tutorial on Cartridge Pleating... it's also called gaging.


The pin there is marking the center of the tip.

Now on to the tedious task of making the cording channels and running the cording. It's not hard... just time consuming, and monotonous.

I did all of this on my sewing machine... because I'm a costumer, NOT a reenactor. If your wanting a highly researched and documented project, your reading the wrong journal. I've invested quite a bit of money in my machines and I'm going to use them, and I'm not even a little bit sorry about that. My methods get the "look" and the "feel" of the costume... but aren't museum pieces. If I can get the look I'm after with the machine I will use it. If I can't I'll do it by hand. I try to do you all a solid though by saying "this could be done by hand using (blah blah blah) method." So yah, as always... grain of salt girls.

If your freaking CRAZY you can make the channels by hand. You can also do the UBER TINY rolled hems by hand as well. **blink blink** the channels are done by placing the cording down as you go, you would fold the fabric over your cord and using a running stitch sew through two layers of fabric thus creating a channel.

To prepare the Brim/Crown first roll hem the neck edge and the face edge. Use a very small rolled hem. I've given 1/4 of an inch for seam allowance this is just enough for an 1/8 rolled hem. If you don't have a tiny rolled hem foot... cut your brim out with extra seam allowance so that the hem doesn't eat up too much fabric.

The Brim/Crown is marked with 13 cording channels. To make the cording channels fold the Brim/Crown along the line and sew using 1/8 seam allowance. This will make a 1/4 channel. Make 1/4 channels on each of the 13 cording channels marked on the Brim/Crown pattern.
You can see how I marked my channels in this picture... I laid the linen over my pattern and marked my channels with pencil.


Ok... my family is begging me to do fun family stuff... they want to make a garden. So next time will be inserting the cording, attaching Tip to Brim/Crown, and attaching the tie.

Before I forget though, because I know many of you have made this kind of thing before, here is the list of the cording lengths. I'm starting at the neck edge (shortest length) and working out to the face edge. (longest length)

14 7/8
15 3/4
17 7/8
18
19 3/8
20 5/8
21 1/4
22 1/4
23 7/8
24 5/8
26 7/8
28 1/2
29 5/8


Until next time my sweets. :)

Friday, June 3, 2011

Regency Drawn Bonnet... Pattern and Tutorial

Sorry that's its taken me so long to start this tutorial. Better late than never I guess. :)

I'm not the best at photoshop, sorry if the pattern is blotchy. I simply scanned my pellon pattern multiple times and saved them as one big image. The pellon is printed with 1x1 squares. (no idea what that means in metric!) You can either print it on a transparency and scale it up that way, or if your good, print it out and tape it together with your printer, or you can do the tried and true, "draw by grid" like we learned in school. :)

This is my pattern:


To make this bonnet you will need:

finely woven linen about 3/4 of a yard
a remnant of silk organza, or fine cotton organdy about 15 x 15 inches square
a hank of peaches and creme crochet cotton
a bodkin, tapestry needle or upholstery needle, or a long piece of craft wire 24" folded in half. (this is the tool you will need to pull the crochet cotton cording through it's channels.
a 1/8" rolled hem foot... you can of course do this by hand.

I don't include a pattern piece for the tie. So in explanation, the tie is a 4" wide length of linen fabric, 80" long... it's two 40 1/2" pieces with a seam at the center back (1/2" seam allow). The center front edges have been turned under in such a way that the edge is pointed.

Where the bonnet is attached to the hat... 9 1/4 on either side of the C.B seam (18 1/2" total) the tie is folded in half with a 1/2 seam allowance attaching the tie to the hat. The total width of the tie will be 1.5". The remaining length of fabric 21 1/2" will have it's raw edges finished with an 1/8 rolled hem foot. You should over lap the rolled hem into the area that is attached to the hat.

I'm going to leave off there.... time to pick the kiddo up from school! This is enough to get you started though. Those of you who've made projects like this before don't need the rest and those that haven't can at least get everything cut out before our next installment... hopefully tomorrow! :)